
相比传统的MySQL复制 , gtid复制无论是配置还是维护都要轻松的多。本文对gtid复制稍作介绍。
MySQL基于GTID复制官方手册 : https://dev.mysql.com/doc/refman/5.7/en/replication-gtids.html
1. gtid 基本概念
传统的基于binlog position复制的方式有个严重的缺点 : 如果slave连接master时指定的binlog文件错误或者position错误 , 会造成遗漏或者重复 , 很多时候前后数据是有依赖性的 , 这样就会出错而导致数据不一致。
从MYSQL5.6开始 , mysql开始支持GTID复制。GTID的全称是global transaction id , 表示的是全局事务ID。GTID的分配方式为uuid:trans_id , 其中 :
uuid是每个mysql服务器都唯一的 , 记录在$datadir/auto.cnf中。如果复制结构中 , 任意两台服务器uuid重复的话(比如直接冷备份时 ,auto.conf中的内容是一致的) , 在启动复制功能的时候会报错。这时可以删除auto.conf文件再重启mysqld。mysql> show variables like "%uuid%"; +---------------+--------------------------------------+ | Variable_name | Value | +---------------+--------------------------------------+ | server_uuid | f27875f0-b64d-11ef-8915-fa163ebf76db | +---------------+--------------------------------------+ 1 row in set (0.01 sec) mysql> exit Bye [root@master ~]# cat /var/lib/mysql/auto.cnf [auto] server-uuid=f27875f0-b64d-11ef-8915-fa163ebf76db trans_id是事务ID, 可以唯一标记某MySQL服务器上执行的某个事务。事务号从1开始 , 每提交一个事务 , 事务号加1。例如"
gtid_executed 5ad9cb8e-2092-11e7-ac95-000c29bf823d:1-6" , 表示该server_uuid上执行了从1到6的事务。
2. gtid的生命周期
gtid的生命周期对于配置和维护基于gtid的复制至关重要。所以 , 请尽可能理解以下几个过程。
gtid在master和slave上是一直持久化保存(即使删除了日志 , 也会记录到Previous_GTID中)的。它在master和slave上的生命周期如下 :
客户端发送
DDL/DML给master上 ,master首先对此事务生成一个唯一的gtid, 假如为uuid_xxx:1, 然后立即执行该事务中的操作。注意 , 主从复制的情况下 ,
sync-binlog基本上都会设置为1, 这表示在每次提交事务时将缓存中的binlog刷盘。所以 , 在事务提交前 ,gtid以及事务相关操作的信息都在缓存中 , 提交后它们才写入到binlog file中 , 然后才会被dump线程dump出去。换句话说 , 只有提交了的事务 ,
gtid和对应的事务操作才会记录到binlog文件中。记录的格式是先记录gtid, 紧跟着再记录事务相关的操作。当
binlog传送到relay log中后 ,slave上的SQL线程首先读取该gtid, 并设置变量gtid_next的值为该gtid, 表示下一个要操作的事务是该gtid。gtid_next是基于会话的 , 不同会话的gtid_next不同。随后
slave检测该gtid在自己的binlog中是否存在。如果存在 , 则放弃此gtid事务;如果不存在 , 则将此gtid写入到自己的binlog中 , 然后立刻执行该事务 , 并在自己的binlog中记录该事务相关的操作。注意 ,
slave上replay的时候 ,gtid不是提交后才写到自己的binlog file的 , 而是判断gtid不存在后立即写入binlog file。通过这种在执行事务前先检查并写
gtid到binlog的机制 , 不仅可以保证当前会话在此之前没有执行过该事务 , 还能保证没有其他会话读取了该gtid却没有提交。因为如果其他会话读取了该gtid会立即写入到binlog(不管是否已经开始执行事务) , 所以当前会话总能判断到binlog中是否该gtid, 于是当前会话就会放弃该事务。总之 , 一个gtid事务是决不允许多次执行、多个会话并行执行的。slave在重放relay log中的事务时 , 不会自己生成gtid, 所以所有的slave(无论是何种方式的一主一从或一主多从复制架构)通过重放relay log中事务获取的gtid都来源于master, 并永久保存在slave上。
3. 基于gtid复制的好处
从上面可以看出 , gtid复制的优点大致有 :
保证同一个事务在某
slave上绝对只执行一次 , 没有执行过的gtid事务总是会被执行。不用像传统复制那样保证
binlog的坐标准确 , 因为根本不需要binlog以及坐标。故障转移到新的
master的时候很方便 , 简化了很多任务。很容易判断
master和slave的数据是否一致。只要master上提交的事务在slave上也提交了 , 那么一定是一致的。
当然 , MySQL提供了选项可以控制跳过某些gtid事务 , 防止slave第一次启动复制时执行master上的所有事务而导致耗时过久。
虽然对于row-based和statement-based的格式都能进行gtid复制 , 但建议采用row-based格式。
4. 配置一主一从的gtid的复制
环境 :
因为是用作master和slave的mysql实例都是全新环境 , 所以这里简单配置一下即可。
master的配置文件 :
[mysqld]
datadir=/var/lib/mysql
socket=/var/lib/mysql/mysql.sock
log-bin=/var/lib/mysql/master-bin # 必须项
sync-binlog=1 # 建议项
binlog_format=row # 建议项
server-id=35 # 必须项
log-error=/var/lib/mysql/error.log
pid-file=/var/lib/mysql/mysqld.pid
enforce_gtid_consistency=on # gtid复制需要加上的必须项
gtid_mode=on # gtid复制需要加上的必须项关于后面的两项 , 是gtid复制所必须开启的项 , 这里指定它开启就行了 , 它们的意义以及更多gtid相关的选项见后文解释。
slave的配置文件 :
[mysqld]
datadir=/var/lib/mysql
socket=/var/lib/mysql/mysql.sock
log-bin=/var/lib/mysql/slave-bin # mysql 5.6必须项 , mysql 5.7非必须项
sync-binlog=1 # 建议项
binlog_format=row # 建议项
relay-log=/var/lib/mysql/slave-bin # 必须项
server-id=36 # 必须项
log-error=/var/lib/mysql/error.log
pid-file=/var/lib/mysql/mysqld.pid
enforce_gtid_consistency=on # 必须项
gtid_mode=on # 必须项我的环境是mysql 9.1.0 , 如果是mysql 5.6 , 那么在上面两个配置文件中需要加上log-slave-updates选项。
重启master和slave后 , 在master上创建一个用于复制的用户repl。
# master上执行
mysql> CREATE USER repl@'192.168.71.%' IDENTIFIED BY 'P@ssword01!';
Query OK, 0 rows affected (0.02 sec)
mysql> GRANT replication slave on *.* to repl@'192.168.71.%';
Query OK, 0 rows affected (0.02 sec)因为master上的binlog没有删除过 , 所以在slave上直接change master to配置连接参数。在最新版本已经将加入主节点的命令替换为change replication source to
# slave上执行, mysql5版本命令
mysql> change master to
master_host='192.168.71.35',
master_port=3306,
master_auto_position=1; # gtid复制必须设置此项
#mysql8以上命令, 以下是有问题的命令
mysql> change replication source to
source_host='192.168.71.35',
source_port=3306,
source_auto_position=1,
source_user='repl',
source_password='P@ssword01!';
Query OK, 0 rows affected, 2 warnings (0.15 sec)
#实际正常命令,mysql8命令
mysql> change replication source to
source_host='192.168.71.35',
source_port=3306,
source_auto_position=1,
source_user='repl',
source_password='P@ssword01!',
get_master_public_key=1;
#mysql9 命令
mysql> change replication source to
source_host='192.168.71.35',
source_port=3306,
source_auto_position=1,
source_user='repl',
source_password='P@ssword01!',
get_source_public_key=1;因为是MySQL 5.7 , 没有在change master to语句中加入user和password项 , 而是在start slave语句中使用 , 否则会警告。
现在启动slave上的两个复制线程。
# slave上执行
mysql> start slave user='repl' password='P@ssword1!';
#直接使用上面有问题的命令加入主节点时, mysql8 以上版本命令使用以下命令
mysql> start replica;
Query OK, 0 rows affected (0.06 sec)
需要注意这里直接启动会提示报错信息。这里报错的原因是因为,现在的mysql8.0的密码加密都是用的 caching_sha2_password这种。
mysql> show replica status \G;
*************************** 1. row ***************************
Replica_IO_State: Connecting to source
Source_Host: 192.168.71.35
Source_User: repl
Source_Port: 3306
Connect_Retry: 60
Source_Log_File:
Read_Source_Log_Pos: 4
Relay_Log_File: slave-bin.000001
Relay_Log_Pos: 4
Relay_Source_Log_File:
Replica_IO_Running: Connecting
Replica_SQL_Running: Yes
Replicate_Do_DB:
Replicate_Ignore_DB:
Replicate_Do_Table:
Replicate_Ignore_Table:
Replicate_Wild_Do_Table:
Replicate_Wild_Ignore_Table:
Last_Errno: 0
Last_Error:
Skip_Counter: 0
Exec_Source_Log_Pos: 0
Relay_Log_Space: 158
Until_Condition: None
Until_Log_File:
Until_Log_Pos: 0
Source_SSL_Allowed: No
Source_SSL_CA_File:
Source_SSL_CA_Path:
Source_SSL_Cert:
Source_SSL_Cipher:
Source_SSL_Key:
Seconds_Behind_Source: 0
Source_SSL_Verify_Server_Cert: No
Last_IO_Errno: 2061
Last_IO_Error: Error connecting to source 'repl@192.168.71.32:3306'. This was attempt 1/10, with a delay of 60 seconds between attempts. Message: Authentication plugin 'caching_sha2_password' reported error: Authentication requires secure connection.
Last_SQL_Errno: 0
Last_SQL_Error:
Replicate_Ignore_Server_Ids:
Source_Server_Id: 0
Source_UUID:
Source_Info_File: mysql.slave_master_info
SQL_Delay: 0
SQL_Remaining_Delay: NULL
Replica_SQL_Running_State: Replica has read all relay log; waiting for more updates
Source_Retry_Count: 10
Source_Bind:
Last_IO_Error_Timestamp: 241213 01:25:36
Last_SQL_Error_Timestamp:
Source_SSL_Crl:
Source_SSL_Crlpath:
Retrieved_Gtid_Set:
Executed_Gtid_Set: 75e056e9-b8a8-11ef-9ab2-fa163e66927c:1-2
Auto_Position: 1
Replicate_Rewrite_DB:
Channel_Name:
Source_TLS_Version:
Source_public_key_path:
Get_Source_public_key: 0
Network_Namespace:
1 row in set (0.00 sec)
这里有两种解决方式,
修改
master库密码的加密方式alter user 'repl'@'192.168.71.%' identified with mysql_native_password by 'slave';设置从库的
change master时加get_master_public_key=1参数stop replica; reset replica all; mysql> change replication source to source_host='192.168.71.35', source_port=3306, source_auto_position=1, source_user='repl', source_password='P@ssword01!', get_master_public_key=1; #mysql9 命令 mysql> change replication source to source_host='192.168.71.35', source_port=3306, source_auto_position=1, source_user='repl', source_password='P@ssword01!', get_source_public_key=1;
这里直接使用命令查看slave状态
还是提示报错
mysql> show replica status \G;
*************************** 1. row ***************************
             Replica_IO_State: Waiting for source to send event
                  Source_Host: 192.168.71.35
                  Source_User: repl
                  Source_Port: 3306
                Connect_Retry: 60
              Source_Log_File: master-bin.000002
          Read_Source_Log_Pos: 2818
               Relay_Log_File: slave-bin.000002
                Relay_Log_Pos: 377
        Relay_Source_Log_File: master-bin.000002
           Replica_IO_Running: Yes
          Replica_SQL_Running: No
              Replicate_Do_DB:
          Replicate_Ignore_DB:
           Replicate_Do_Table:
       Replicate_Ignore_Table:
      Replicate_Wild_Do_Table:
  Replicate_Wild_Ignore_Table:
                   Last_Errno: 1396
                   Last_Error: Coordinator stopped because there were error(s) in the worker(s). The most recent failure being: Worker 1 failed executing transaction '7a40fdc0-b8a8-11ef-a26e-fa163ebf76db:1' at source log master-bin.000002, end_log_pos 478. See error log and/or performance_schema.replication_applier_status_by_worker table for more details about this failure or others, if any.
                 Skip_Counter: 0
          Exec_Source_Log_Pos: 158
              Relay_Log_Space: 3242
              Until_Condition: None
               Until_Log_File:
                Until_Log_Pos: 0
           Source_SSL_Allowed: No
           Source_SSL_CA_File:
           Source_SSL_CA_Path:
              Source_SSL_Cert:
            Source_SSL_Cipher:
               Source_SSL_Key:
        Seconds_Behind_Source: NULL
Source_SSL_Verify_Server_Cert: No
                Last_IO_Errno: 0
                Last_IO_Error:
               Last_SQL_Errno: 1396
               Last_SQL_Error: Coordinator stopped because there were error(s) in the worker(s). The most recent failure being: Worker 1 failed executing transaction '7a40fdc0-b8a8-11ef-a26e-fa163ebf76db:1' at source log master-bin.000002, end_log_pos 478. See error log and/or performance_schema.replication_applier_status_by_worker table for more details about this failure or others, if any.
  Replicate_Ignore_Server_Ids:
             Source_Server_Id: 32
                  Source_UUID: 7a40fdc0-b8a8-11ef-a26e-fa163ebf76db
             Source_Info_File: mysql.slave_master_info
                    SQL_Delay: 0
          SQL_Remaining_Delay: NULL
    Replica_SQL_Running_State:
           Source_Retry_Count: 10
                  Source_Bind:
      Last_IO_Error_Timestamp:
     Last_SQL_Error_Timestamp: 241213 01:33:54
               Source_SSL_Crl:
           Source_SSL_Crlpath:
           Retrieved_Gtid_Set: 7a40fdc0-b8a8-11ef-a26e-fa163ebf76db:1-8
            Executed_Gtid_Set: 75e056e9-b8a8-11ef-9ab2-fa163e66927c:1-2
                Auto_Position: 1
         Replicate_Rewrite_DB:
                 Channel_Name:
           Source_TLS_Version:
       Source_public_key_path:
        Get_Source_public_key: 1
            Network_Namespace:
1 row in set (0.00 sec)发现slave接受到的gtid和执行的gtid不一致。由于整个集群里面本身没有数据, 所以直接使用以下命令直接执行最近收到的gtid即可
mysql> show global variables like '%gtid%';
+----------------------------------+------------------------------------------+
| Variable_name                    | Value                                    |
+----------------------------------+------------------------------------------+
| binlog_gtid_simple_recovery      | ON                                       |
| enforce_gtid_consistency         | ON                                       |
| gtid_executed                    | 75e056e9-b8a8-11ef-9ab2-fa163e66927c:1-2 |
| gtid_executed_compression_period | 0                                        |
| gtid_mode                        | ON                                       |
| gtid_owned                       |                                          |
| gtid_purged                      |                                          |
| session_track_gtids              | OFF                                      |
+----------------------------------+------------------------------------------+
8 rows in set (0.02 sec)


mysql> stop replica;
Query OK, 0 rows affected (0.01 sec)

mysql> reset replica;
Query OK, 0 rows affected (0.05 sec)

mysql> reset binary logs and gtids;
Query OK, 0 rows affected (0.06 sec)

mysql> show global variables like '%gtid%';
+----------------------------------+-------+
| Variable_name                    | Value |
+----------------------------------+-------+
| binlog_gtid_simple_recovery      | ON    |
| enforce_gtid_consistency         | ON    |
| gtid_executed                    |       |
| gtid_executed_compression_period | 0     |
| gtid_mode                        | ON    |
| gtid_owned                       |       |
| gtid_purged                      |       |
| session_track_gtids              | OFF   |
+----------------------------------+-------+
8 rows in set (0.01 sec)

mysql> set @@global.gtid_purged='7a40fdc0-b8a8-11ef-a26e-fa163ebf76db:1-8';
Query OK, 0 rows affected (0.01 sec)

mysql> show global variables like '%gtid%';
+----------------------------------+------------------------------------------+
| Variable_name                    | Value                                    |
+----------------------------------+------------------------------------------+
| binlog_gtid_simple_recovery      | ON                                       |
| enforce_gtid_consistency         | ON                                       |
| gtid_executed                    | 7a40fdc0-b8a8-11ef-a26e-fa163ebf76db:1-8 |
| gtid_executed_compression_period | 0                                        |
| gtid_mode                        | ON                                       |
| gtid_owned                       |                                          |
| gtid_purged                      | 7a40fdc0-b8a8-11ef-a26e-fa163ebf76db:1-8 |
| session_track_gtids              | OFF                                      |
+----------------------------------+------------------------------------------+
8 rows in set (0.00 sec)

mysql> start replica;
Query OK, 0 rows affected (0.09 sec)

mysql> show replica status \G;
*************************** 1. row ***************************
             Replica_IO_State: Waiting for source to send event
                  Source_Host: 192.168.71.35
                  Source_User: repl
                  Source_Port: 3306
                Connect_Retry: 60
              Source_Log_File: master-bin.000002
          Read_Source_Log_Pos: 2818
               Relay_Log_File: slave-bin.000003
                Relay_Log_Pos: 425
        Relay_Source_Log_File: master-bin.000002
           Replica_IO_Running: Yes
          Replica_SQL_Running: Yes
              Replicate_Do_DB:
          Replicate_Ignore_DB:
           Replicate_Do_Table:
       Replicate_Ignore_Table:
      Replicate_Wild_Do_Table:
  Replicate_Wild_Ignore_Table:
                   Last_Errno: 0
                   Last_Error:
                 Skip_Counter: 0
          Exec_Source_Log_Pos: 2818
              Relay_Log_Space: 811
              Until_Condition: None
               Until_Log_File:
                Until_Log_Pos: 0
           Source_SSL_Allowed: No
           Source_SSL_CA_File:
           Source_SSL_CA_Path:
              Source_SSL_Cert:
            Source_SSL_Cipher:
               Source_SSL_Key:
        Seconds_Behind_Source: 0
Source_SSL_Verify_Server_Cert: No
                Last_IO_Errno: 0
                Last_IO_Error:
               Last_SQL_Errno: 0
               Last_SQL_Error:
  Replicate_Ignore_Server_Ids:
             Source_Server_Id: 32
                  Source_UUID: 7a40fdc0-b8a8-11ef-a26e-fa163ebf76db
             Source_Info_File: mysql.slave_master_info
                    SQL_Delay: 0
          SQL_Remaining_Delay: NULL
    Replica_SQL_Running_State: Replica has read all relay log; waiting for more updates
           Source_Retry_Count: 10
                  Source_Bind:
      Last_IO_Error_Timestamp:
     Last_SQL_Error_Timestamp:
               Source_SSL_Crl:
           Source_SSL_Crlpath:
           Retrieved_Gtid_Set:
            Executed_Gtid_Set: 7a40fdc0-b8a8-11ef-a26e-fa163ebf76db:1-8
                Auto_Position: 1
         Replicate_Rewrite_DB:
                 Channel_Name:
           Source_TLS_Version:
       Source_public_key_path:
        Get_Source_public_key: 1
            Network_Namespace:
1 row in set (0.00 sec)查看io线程和sql线程是否正常。
# slave上执行 , 为了排版 , 缩减了一些无关紧要的字段
mysql> show processlist;
+----+-------------+---------+--------------------------------------------------------+
| Id | User        | Command | State                                                  |
+----+-------------+---------+--------------------------------------------------------+
|  9 | root        | Query   | starting                                               |
| 10 | system user | Connect | Waiting for master to send event                       |
| 11 | system user | Connect | Slave has read all relay log; waiting for more updates |
+----+-------------+---------+--------------------------------------------------------+最后验证gtid复制是否生效。
在master上插入一些数据。这里使用上一篇文章中使用的存储过程proc_num1和proc_num2分别向数值辅助表backup.num_isam和backup.num_innodb中插入一些数据
# 向MyISAM数值辅助表backup.num_isam插入100W行数据
call proc_num1(1000000);

# 向InnoDB数值辅助表backup.num_innodb插入100W行数据
call proc_num2(1000000);在slave上查看slave的状态 , 以下是同步结束后的状态信息。
# slave上执行 :
mysql> show replica status \G;
*************************** 1. row ***************************
             Replica_IO_State: Waiting for source to send event
                  Source_Host: 192.168.71.35
                  Source_User: repl
                  Source_Port: 3306
                Connect_Retry: 60
              Source_Log_File: master-bin.000002
          Read_Source_Log_Pos: 10059939
               Relay_Log_File: slave-bin.000004
                Relay_Log_Pos: 10060158
        Relay_Source_Log_File: master-bin.000002
           Replica_IO_Running: Yes
          Replica_SQL_Running: Yes
              Replicate_Do_DB:
          Replicate_Ignore_DB:
           Replicate_Do_Table:
       Replicate_Ignore_Table:
      Replicate_Wild_Do_Table:
  Replicate_Wild_Ignore_Table:
                   Last_Errno: 0
                   Last_Error:
                 Skip_Counter: 0
          Exec_Source_Log_Pos: 10059939
              Relay_Log_Space: 10060451
              Until_Condition: None
               Until_Log_File:
                Until_Log_Pos: 0
           Source_SSL_Allowed: No
           Source_SSL_CA_File:
           Source_SSL_CA_Path:
              Source_SSL_Cert:
            Source_SSL_Cipher:
               Source_SSL_Key:
        Seconds_Behind_Source: 0
Source_SSL_Verify_Server_Cert: No
                Last_IO_Errno: 0
                Last_IO_Error:
               Last_SQL_Errno: 0
               Last_SQL_Error:
  Replicate_Ignore_Server_Ids:
             Source_Server_Id: 35
                  Source_UUID: c79a95a7-ba1a-11ef-9fa7-fa163eacdccc
             Source_Info_File: mysql.slave_master_info
                    SQL_Delay: 0
          SQL_Remaining_Delay: NULL
    Replica_SQL_Running_State: Replica has read all relay log; waiting for more updates
           Source_Retry_Count: 10
                  Source_Bind:
      Last_IO_Error_Timestamp:
     Last_SQL_Error_Timestamp:
               Source_SSL_Crl:
           Source_SSL_Crlpath:
           Retrieved_Gtid_Set: c79a95a7-ba1a-11ef-9fa7-fa163eacdccc:1-55
            Executed_Gtid_Set: c79a95a7-ba1a-11ef-9fa7-fa163eacdccc:1-55
                Auto_Position: 1
         Replicate_Rewrite_DB:
                 Channel_Name:
           Source_TLS_Version:
       Source_public_key_path:
        Get_Source_public_key: 1
            Network_Namespace:
1 row in set (0.00 sec)
5. 添加新的slave到gtid复制结构中
GTID复制是基于事务ID的 , 确切地说是binlog中的GTID , 所以事务ID对GTID复制来说是命脉。
当master没有删除过任何binlog时 , 可以随意地向复制结构中添加新的slave , 因为slave会复制所有的binlog到自己relay log中并replay。这样的操作尽管可能速度不佳 , 但胜在操作极其简便。
当master删除过一部分binlog后 , 在向复制结构中添加新的slave时 , 必须先获取到master binlog中当前已记录的第一个gtid之前的所有数据 , 然后恢复到slave上。只有slave上具有了这部分基准数据 , 才能保证和master的数据一致性。
而在实际环境中 , 往往会定期删除一部分binlog。所以 , 为了配置更通用的gtid复制环境 , 这里把前文的master的binlog给purge掉一部分。
目前master上的binlog使用情况如下 , 不难发现绝大多数操作都集中在master-bin.000002这个binlog中。
[root@master ~]# ll /var/lib/mysql/*bin*
-rw-r----- 1 mysql mysql     2485 Dec 14 21:06 /var/lib/mysql/binlog.000001
-rw-r----- 1 mysql mysql       16 Dec 14 20:56 /var/lib/mysql/binlog.index
-rw-r----- 1 mysql mysql      747 Dec 14 21:14 /var/lib/mysql/master-bin.000001
-rw-r----- 1 mysql mysql 10059939 Dec 14 21:19 /var/lib/mysql/master-bin.000002
-rw-r----- 1 mysql mysql 66 Dec 14 21:14 /var/lib/mysql/master-bin.indexpurge已有的binlog。
mysql> flush logs;
Query OK, 0 rows affected (0.09 sec)

mysql> PURGE BINARY logs to 'master-bin.000003';
Query OK, 0 rows affected (0.01 sec)
[root@master ~]# cat /var/lib/mysql/master-bin.index
/var/lib/mysql/master-bin.000003但无论master是否purge过binlog , 配置基于gtid的复制都极其方便 , 而且方法众多(只要理解了GTID的生命周期 , 可以随意折腾 , 基本上都能很轻松地维护好) , 这是它"迷人"的优点。
现在的测试环境是这样的 :
其中slave2的配置文件和slave1的配置文件完全相同 :
[mysqld]
datadir=/var/lib/mysql
socket=/var/lib/mysql/mysql.sock
log-bin=/var/lib/mysql/slave-bin           # mysql 5.6必须项 , mysql 5.7非必须项
sync-binlog=1                              # 建议项
binlog_format=row                          # 建议项
relay-log=/var/lib/mysql/slave-bin         # 必须项
server-id=37                               # 必须项
log-error=/var/lib/mysql/error.log
pid-file=/var/lib/mysql/mysqld.pid

enforce_gtid_consistency=on                # 必须项
gtid_mode=on                               # 必须项
备份
master。我选择的是
xtrabackup的innobackupex工具 , 因为它速度快 , 操作简单 , 而且在线备份也比较安全。# master上执行 , 备份所有数据 : [root@master ~]# mkdir /backdir # 备份目录 [root@master ~]# xtrabackup -uroot -pP@ssword01! /backdir/ # 准备数据 [root@master ~]# scp -rp /backdir 192.168.71.37:/tmp/将备份恢复到
slave2。在slave2上执行 :
[root@slave02 ~]# systemctl stop mysqld
[root@slave02 ~]# rm -rf /var/lib/mysql/*    # 恢复前必须先清空数据目录
[root@slave02 ~]# xtrabackup --prepare --target-dir=/tmp/backdir # 预准备备份数据
[root@slave02 ~]# xtrabackup --copy-back --target-dir=/tmp/backdir/  #复制到数据库目录

[root@slave02 ~]# chown -R mysql.mysql /var/lib/mysql/
[root@slave02 ~]# systemctl start mysqld
设置
gtid_purged, 连接master, 开启复制功能。由于
xtrabackup备份数据集却不备份binlog, 所以必须先获取此次备份结束时的最后一个事务ID, 并在slave上明确指定跳过这些事务 , 否则slave会再次从master上复制这些binlog并执行 , 导致数据重复执行。可以从
slave2数据目录中的xtrabackup_info文件中获取。如果不是xtrabackup备份的 , 那么可以直接从master的show global variables like "gtid_executed";中获取 , 它表示master中已执行过的事务。[root@slave02 ~]# cat /var/lib/mysql/xtrabackup_info uuid = 224013a0-ba21-11ef-8adf-fa163eacdccc name = tool_name = xtrabackup tool_command = -uroot -p=... --backup --target-dir=/backdir/ tool_version = 8.3.0-1 ibbackup_version = 8.3.0-1 server_version = 8.3.0 server_flavor = MySQL Community Server - GPL start_time = 2024-12-14 21:41:29 end_time = 2024-12-14 21:41:34 lock_time = 2 binlog_pos = filename 'master-bin.000004', position '198', GTID of the last change 'c79a95a7-ba1a-11ef-9fa7-fa163eacdccc:1-55' innodb_from_lsn = 0 innodb_to_lsn = 20459395 partial = N incremental = N format = file compressed = N encrypted = N其中
binlog_pos中的GTID对应的就是已备份的数据对应的事务。换句话说 , 这里的gtid集合1-55表示这55个事务不需要进行复制。或者在
master上直接查看executed的值 , 注意不是gtid_purged的值 ,master上的gtid_purged表示的是曾经删除掉的binlog。mysql> show global variables like '%gtid%'; +----------------------------------+-------------------------------------------+ | Variable_name | Value | +----------------------------------+-------------------------------------------+ | binlog_gtid_simple_recovery | ON | | enforce_gtid_consistency | OFF | | gtid_executed | c79a95a7-ba1a-11ef-9fa7-fa163eacdccc:1-55 | | gtid_executed_compression_period | 0 | | gtid_mode | OFF | | gtid_owned | | | gtid_purged | c79a95a7-ba1a-11ef-9fa7-fa163eacdccc:1-55 | | session_track_gtids | OFF | +----------------------------------+-------------------------------------------+ 8 rows in set (0.00 sec)可以在启动slave线程之前使用
gtid_purged变量来指定需要跳过的gtid集合。但因为要设置gtid_purged必须保证全局变量gtid_executed为空 , 所以先在slave上执行reset master(注意 , 不是reset slave) , 再设置gtid_purged。# slave2上执行 : mysql> RESET BINARY LOGS AND GTIDS; Query OK, 0 rows affected (0.39 sec) mysql> set @@global.gtid_purged='c79a95a7-ba1a-11ef-9fa7-fa163eacdccc:1-55';设置好
gtid_purged之后 , 就可以开启复制线程了。mysql> change replication source to source_host='192.168.71.35', source_port=3306, source_auto_position=1, source_user='repl', source_password='P@ssword01!', get_source_public_key=1; mysql> start replica; Query OK, 0 rows affected (0.03 sec)查看
slave的状态 , 看是否正确启动了复制功能。如果没错 , 再在master上修改一部分数据 , 检查是否同步到slave1和slave2。回到
master,purge掉已同步的binlog。当
slave指定gtid_purged并实现了同步之后 , 为了下次重启mysqld实例不用再次设置gtid_purged(甚至可能会在启动的时候自动开启复制线程) , 所以应该去master上将已经同步的binlog给purged掉。# master上执行 : mysql> flush logs; # flush之后滚动到新的日志master-bin.000006 # 在确保所有slave都复制完000005之前的所有事务后 , purge掉旧日志 mysql> purge master logs to "master-bin.000005";
6. GTID复制相关的状态信息和变量
6.1 show slave status中和gtid复制相关的状态行
Retrieved_Gtid_Set: c79a95a7-ba1a-11ef-9fa7-fa163eacdccc:1-55
 Executed_Gtid_Set: c79a95a7-ba1a-11ef-9fa7-fa163eacdccc:1-55
     Auto_Position: 1
其中 :
Retrieved_Gtid_Set: 在开启了gtid复制(即gtid_mode=on)时 ,slave在启动io线程的时候会检查自己的relay log, 并从中检索出gtid集合。也就是说 , 这代表的是slave已经从master中复制了哪些事务过来。检索出来的gtid不会再请求master发送过来。Executed_Gtid_Set: 在开启了gtid复制(即gtid_mode=on)时 , 它表示已经向自己的binlog中写入了哪些gtid集合。注意 , 这个值是根据一些状态信息计算出来的 , 并非binlog中能看到的那些。举个特殊一点的例子 , 可能slave的binlog还是空的 , 但这里已经显示一些已执行gtid集合了。Auto_Position: 开启gtid时是否自动获取binlog坐标。1表示开启 , 这是gtid复制的默认值。
6.2 binlog中关于gtid的信
例如 :
[root@xuexi ~]# mysqlbinlog /data/master-bin.000007
/*!50530 SET @@SESSION.PSEUDO_SLAVE_MODE=1*/;
/*!50003 SET @OLD_COMPLETION_TYPE=@@COMPLETION_TYPE,COMPLETION_TYPE=0*/;
DELIMITER /*!*/;
# at 4
#180610  1:34:08 server id 100  end_log_pos 123 CRC32 0x4a6e9510        Start: binlog v 4, server v 5.7.22-log created 180610  1:34:08
# Warning: this binlog is either in use or was not closed properly.
BINLOG '
kA8cWw9kAAAAdwAAAHsAAAABAAQANS43LjIyLWxvZwAAAAAAAAAAAAAAAAAAAAAAAAAAAAAAAAAA
AAAAAAAAAAAAAAAAAAAAAAAAEzgNAAgAEgAEBAQEEgAAXwAEGggAAAAICAgCAAAACgoKKioAEjQA
ARCVbko=
'/*!*/;
# at 123
#180610  1:34:08 server id 100  end_log_pos 194 CRC32 0x0f6ba409        Previous-GTIDs
# a659234f-6aea-11e8-a361-000c29ed4cf4:1-57         #### 注意行1
# at 194
#180610  2:06:31 server id 100  end_log_pos 259 CRC32 0xfef9194e        GTID    last_committed=0        sequence_number=1       rbr_only=no  #### 注意行2
SET @@SESSION.GTID_NEXT= 'a659234f-6aea-11e8-a361-000c29ed4cf4:58'/*!*/;   #### 注意行3
# at 259
#180610  2:06:31 server id 100  end_log_pos 359 CRC32 0x5a561d94        Query   thread_id=2     exec_time=0     error_code=0
use `backup`/*!*/;
SET TIMESTAMP=1528567591/*!*/;
SET @@session.pseudo_thread_id=2/*!*/;
SET @@session.foreign_key_checks=1, @@session.sql_auto_is_null=0, @@session.unique_checks=1, @@session.autocommit=1/*!*/;
SET @@session.sql_mode=1436549152/*!*/;
SET @@session.auto_increment_increment=1, @@session.auto_increment_offset=1/*!*/;
/*!\C utf8 *//*!*/;
SET @@session.character_set_client=33,@@session.collation_connection=33,@@session.collation_server=8/*!*/;
SET @@session.lc_time_names=0/*!*/;
SET @@session.collation_database=DEFAULT/*!*/;
create table t1(n int)
/*!*/;
# at 359
#180610  2:09:36 server id 100  end_log_pos 424 CRC32 0x82564e69        GTID    last_committed=1        sequence_number=2       rbr_only=no     #### 注意行4
SET @@SESSION.GTID_NEXT= 'a659234f-6aea-11e8-a361-000c29ed4cf4:59'/*!*/;  #### 注意行5
# at 424
#180610  2:09:36 server id 100  end_log_pos 524 CRC32 0xbc21683a        Query   thread_id=2     exec_time=0     error_code=0
SET TIMESTAMP=1528567776/*!*/;
create table t2(n int)
/*!*/;
SET @@SESSION.GTID_NEXT= 'AUTOMATIC' /* added by mysqlbinlog */ /*!*/;   #### 注意行6
DELIMITER ;
# End of log file
/*!50003 SET COMPLETION_TYPE=@OLD_COMPLETION_TYPE*/;
/*!50530 SET @@SESSION.PSEUDO_SLAVE_MODE=0*/;
其中 :
"注意行1"中
Previous-GTIDs代表的gtid集合是曾经的gtid, 换句话说是被purge掉的事务。"注意行2"和"注意行4"是两个事务的
gtid信息。它们写在每个事务的前面。"注意行3"和"注意行5"设置了
GTID_NEXT的值 , 表示读取到了该事务后 , 那么必须要执行的是稍后列出的这个事务。"注意行6"是在所有事务执行结束时设置的 , 表示自动获取
gtid的值。它对复制是隐身的(也就是说不会dump线程不会将它dump出去) , 该行的结尾也说了 , 这一行是mysqlbinlog添加的。
6.3 一些重要的变量
gtid_mode: 是否开启gtid复制模式。只允许on/off类的布尔值 , 不允许其他类型(如1/0)的布尔值 , 实际上这个变量是枚举类型的。要设置gtid_mode=on, 必须同时设置enforce_gtid_consistency开。在MySQL 5.6中 , 还必须开启log_slave_updates, 即使是master也要开启。enforce_gtid_consistency: 强制要求只允许复制事务安全的事务。gtid_mode=on时必须显式设置该项 , 如果不给定值 , 则默认为on。应该尽量将该选项放在gtid_mode的前面 , 减少启动mysqld时的检查。不能在事务内部创建和删除临时表。只能在事务外部进行 , 且
autocommit需要设置为1。不能执行
create table ... select语句。该语句除了创建一张新表并填充一些数据 , 其他什么事也没干。不能在事务内既更新事务表又更新非事务表。
gtid_executed: 已经执行过的GTID。reset master会清空该项的全局变量值。gtid_purged: 已经purge掉的gtid。要设置该项 , 必须先保证gtid_executed已经为空 , 这意味着也一定会同时设置该项为空。在slave上设置该项时 , 表示稍后启动io线程和SQL线程都跳过这些gtid,slave上设置时应该让此项的gtid集合等于master上gtid_executed的值。gtid_next: 表示下一个要执行的gtid事务。
需要注意 , master和slave上都有gtid_executed和gtid_purged , 它们代表的意义有时候是不同的。
还有一些变量 , 可能用到的不会多。如有需要 , 可翻官方手册。
6.4 mysql.gtid_executed表
MySQL 5.7中添加了一张记录已执行gtid的表mysql.gtid_executed , 所以slave上的binlog不是必须开启的。
mysql> select * from mysql.gtid_executed;
+--------------------------------------+----------------+--------------+
| source_uuid                          | interval_start | interval_end |
+--------------------------------------+----------------+--------------+
| a659234f-6aea-11e8-a361-000c29ed4cf4 |              1 |           57 |
| a659234f-6aea-11e8-a361-000c29ed4cf4 |             58 |           58 |
| a659234f-6aea-11e8-a361-000c29ed4cf4 |             59 |           59 |
+--------------------------------------+----------------+--------------+
7. 一张图说明GTID复制
在前面第6节中 , 使用了xtrabackup备份的方式提供gtid复制的基准数据。其中涉及到一些gtid检查、设置的操作。通过这些操作 , 大概可以感受的到gtid复制的几个概念。
用一张图来说明 :
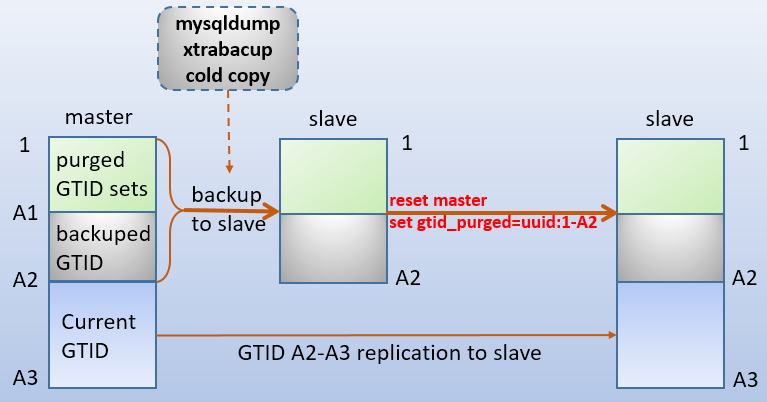
假如当前master的gtid为A3 , 已经purge掉的gtid为"1-->A1" , 备份到slave上的数据为1-A2部分。
如果A1 = 0 , 表示master的binlog没有被Purge过。slave可以直接开启gtid复制 , 但这样可能速度较慢 , 因为slave要复制所有binlog。也可以将master数据备份到slave上 , 然后设置gtid_purged 跳过备份结束时的gtid , 这样速度较快。
如果A1 != 0 , 表示master上的binlog中删除了一部分gtid。此时slave上必须先从master处恢复purge掉的那部分日志对应的数据。上图中备份结束时的GTID为A2。然后slave开启复制 , 唯一需要考虑的是"是否需要设置 gtid_purged跳过一部分gtid以避免重复执行"。
备份数据到slave上 , 方式可以是mysqldump、冷备份、xtrabackup备份都行。由于gtid复制的特性 , 所需要的操作都很少 , 也很简单 , 前提是理解了"gtid的生命周期"。
参考链接
深入MySQL复制(二) : 基于GTID复制 - 骏马金龙 - 博客园